Tempt your adventurous mixologist within (or the one at your favorite establishment) to take you on a whirlwind tour of the top shelf by preparing a flight of cocktails for you and a couple of thoughtful drinking buddies. It's a fun way to try out new concoctions, and a great excuse to survey the field of spirits. Some bartenders team up with the restaurant's chef to bring food pairings into the mix.
A Couple of Ways to Go
One approach is to showcase a single liquor in a variety of cocktails. You and two or three friends get a little pour (just enough to really taste it, but not so much that you have to pack it in and head for home early). This is a great do-at-home approach, because you only need to purchase one bottle of the liquor in question.
Another approach is to make the same cocktail featuring five or six brands of the same booze. While this is probably the most scientific way to find out which brand tastes best in your favorite cocktail, the variety and interest comes in the subtleties of the liquors. If you're feeling highly rational and looking to hone your tasting skills, this might be your gig. I found out how little difference vodka filtered 35 or 135 times makes once mixed with citrus or other potent flavors. Whiskey, by contrast, remains fairly recognizable even when dosed.
The third, and perhaps least scientific but highly entertaining and crowd-pleasing way, is to have your mixologist prepare a bunch of cocktails using several brands. In the end you won't learn much about the subtle differences between liquors as sharply as you might using a stricter approach, but if your bartender is knowledgeable, it can still be a great way to get introduced to new spirits.
Who's Doing It?
In Boston at the Metropolitan club, the Flight to Provence martini sampler is offered with snacks and a unique “liquid Caprese” salad created by chef Todd Winer. In New York at Flaturon, mixologist Julie Reiner offers themed cocktail tastings. At Trois restaurant in Atlanta, Eric Simpkins brings Sazerac to several classic and not so classic recipes.

Thursday, December 28
Wednesday, November 1
A Fry By Any Other Name: Street Foods of Belgium, Part Deux

Despite the best efforts of our thoughtful congress to change it's name, the French Fry continues to show up on plates at diners and bistros all over this great land. But fries by any other name would have to be frites--a shortening of the French pommes frites (fried potatoes). In French, potatos are called pommes de terre (literally apples of the earth), so the pomme in pomme frites is itself a shortening for potato.
In Belgium, frites don't typically come on plates. Instead, they're served in simple paper cones, usually sauced with flavored mayonnaise. The experience of getting frites in Brussels reminded me a bit of the Atlantic City boardwalk--minus the bitter aroma of despair. Frites are mainly street food made fresh in stands, and they're not accompaniments. They're often eaten as a meal.
The Secret (or two)
Frites are made using fresh potatoes, fried twice. Once at around 325-350 degrees Fahrenheit to thoroughly cook the potato (4-8 minutes). Then, after cooling, they're fried again at 375 (1-2 minutes) to burnish them with a golden brown finish and snappy texture.
Why twice? The first frying cooks and dehydrates the fresh potato: by cooking at a medium temperature, the surface of the potato remains permeable to steam escaping from inside, drying out the flesh. According to some experts, the rushing bubbles of steam off the surface of the potato helps to block the cooking oil from saturating into the fry.
The idea during the first frying is to just cook the potato until it's edible, but no more. The fries are then cooled in a single layer to quickly stop the cooking. When plunged into the oil again, this time at a higher temperature, the surface of the fry seals and browns while the inside simply reheats. If done right, the result is light, fluffy, somewhat dry potato insides and a crisp golden-brown outside.
Soggy world
Unfortunately, it isn't as easy to get right as it might seem. In Brussels, as much as I hate to say it, most of the stands had pretty lame fries. Like anything, attention to detail from vendor to vendor was pretty uneven. On top of that, equipment can vary greatly when it comes to temperature control, as can the types of potato and fat being used. If these variables don't get due attention, the result can be disappointing. Not everybody was totally on top of those issues.
Saucy world
Rightly or wrongly, a good, rich mayo-based sauce can cover up a lot, and there was rarely a lack of customers even at the most uninspired fritures. Mayonnaise is a traditional topping for frites--there's no vinegar or ketchup cluttering up the counter tops of the fritures--but there are plenty of variants on the basic garlic aioli you'll almost always find. One of my friend's favorites, pili pili (an African term for hot peppers and sauces) is a mildly hot, chili-spiced one. Sauce andalouse is flavored with tomato, sweet peppers and onion. The list goes on--way on.
A couple of tips
In large commercial fryers, the amount of oil pretty well ensures a reasonably consistent frying temperature. At home, small batches are required to compensate for the lack of oil volume. Russets are a good choice. They're drier and have a bit less starch than other types of potatoes, resulting in a better finished texture. If you're not using them, experiment to find the right cooking time before you start. I made a batch using a different variety without taking care to test the timing. Waxy is the word that springs to mind. One other tip, experts recommend one centimeter-square pieces.
What to watch for
Poorly executed frites are flabby and saturated with cooking oil. They're not crispy, and they lack both a strong potato flavor inside and the rich brown, caramelized outer layer. Worst case, if poorly stored or inferior potatoes are used, they may even taste vegetal, grassy or bitter on top of being oily. Doesn't that sound good?
The big fat controversy
I've read several threads about Alton Brown's comment that frites were made with horse fat in days gone by. Other's say it was ox fat. Others say regular cow lard. I've even heard of duck fat being used. In today's Belgium, most frites are made with some sort of vegetable or nut oil (or combination). As a side note, Atlantic Fries from Thrasher's (the big name in boardwalk fries) are made using peanut oil exclusively.
How we do it here
Most American-style fries, including Thrasher's, are cooked just once at a high temperature. This can result in a crispy outside when first pulled from the fryer, but the higher residual moisture content in the fry (since steam has not been able to escape as efficiently) quickly re-hydrates the crispy layer, resulting in a soggy fry before too long under the heat lamp.
Atlantic City boardwalk fries are made by soaking the raw potato in salt water prior to cooking. This soaking is purported to remove the outer layer of starch, but I suspect that the salt also draws moisture out of the potato, resulting in a nicely salty, crisper result.
Monday, October 23
The Belgian Waffle: Street Foods of Brussels One
The International House of Pancakes, Denny's, and most likely your local diner serve some deep pocketed round or square waffle they call Belgian. The purpose of this cratered slab is to capture powdered sugar, jams, jellies, and other sugary toppings and whipped cream, and while this concoction may be appealing to the twelve and under crowd, it doesn't have a lot in common with gaufres, their original Brussels street food inspiration.
Instead of restaurants, gaufres are commonly made in street stands and meant to be eaten as you stroll and shop. At the Saturday morning farmer's market amid roasting chickens, a simmering escargo pot, and lots of fresh produce and cheese, you'll find at least one stand minting fresh gaufres that you can buy by the kilo and carry off in a wax paper bag.
Waffle Art
The idea of cooking flat bread dough or batter between two hot metal plates can be traced back to at least ancient Greece, according to Larousse Gastonomique. At some point in medieval Europe, cross-hatch patterns were added to the plates, producing a honeycomb-like design on the finished product. The old French word for honeycomb being gaufre, it's likely that's how the French name got it's start. My dad, a pretty reliable language scholar, adds: "Our word 'waffle' owes its origin to an early German word 'wafel' which was also borrowed into Old French as 'gaufre, meaning both 'waffle' and 'honeycomb.' " Go dad!
The American version of gaufres, the "Belgian Waffle," was actually introduced at the 1964 World's Fair food by a Brussels man by the name of Maurice Vermersch even though it had been around in Europe in one form or another for hundreds of years.
Yeast, No Baking Soda
In America, we've come to think of waffles, more or less, as pancake batter pressed in a special iron. As you probably know, most pancake batters (with exceptions, such as the blini) use baking soda and powder to gain their height and texture. The traditional gaufres recipe is yeasted and the dough is dense and and sticky, more like brioche dough. It has to be scooped and scraped onto the iron, not poured. Lard, not butter or vegetable, was the traditional fat used to grease the plates, although that's no longer the fashion in our more health-conscious world.
Gaufres take longer to cook than American style waffles, and the finished product is hand-sized and irregular in shape. The most striking difference, however, is the flavor. Unlike box pancakes and waffles, extras like maple syrup, butter, and jams aren't the main attraction, and there's no lingering chemical bicarbonate pall. Gaufres have a fermented, tangy flavor blended with sugar and some salt to create a balance that easily stands on it's own. Simple and definitely not as tarted up as their American counterpart, gaufres are the perfect accompaniment to a cool, crisp Brussels morning (or a quick nosh at 4am when the clubs close their doors).
Monday, October 9
Sake To Me
Sake is what comes hot in a small cup when you order sushi, right? Most of the time that's what you get, but there are cold sakes and cloudy, unfiltered ones. There are all sorts of levels and grades of sake: some that are rare, small batch, and unique--and some not.
What is Sake?
Sake is brewed like beer. Raw starchy ingredients in beer (hops) get broken down by molds into simpler carbs that yeast can then convert into alcohol. In sake, the raw starchy material is rice but the rest of the process follows suit. Sake rice, like sushi rice, is its own special species. Sake rice is generally larger grained because the outside layers get stripped away to produce a refined, purer starch center. The amount of "polishing" of the rice determines some of the grade and quality of the sake. For more about sake grades and how it's made, check out an upcoming piece I wrote for Wine Enthusiast Online about sake.
Why Warm, Anyway?
Warm sake is a welcome respite on a cold day, but the raised temperature also evaporates the alcohol more aggressively, filling your nose and dampening other smells. For this reason, often cheaper sake is heated to add a bit of panache as well as mask its weaker character, which is why that's what you usually get at average sushi bars.
Sake vs. Wine
Is there any point in comparing? Some would say yes, others no. In the end, they're very different beverages with strikingly different methods and techniques employed, different histories, and very different characters. In my humble opinion, drink what you like in the context that gives you the most pleasure. Just like wine or beer, I can easily be tempted to try sake I've never heard of.
However, there are a few striking differences worth noting. The flavor of sake comes primarily from the microbes used to convert the raw rice starch into simple sugars and then alcohol. Sake brewers spend a great deal of effort tending their microbes to ensure the right ones with the most desirable flavor characteristics get into the mash. And then there's brewing technique, an entire science unto itself.
Wine grapes, unlike polished rice nuggets, have natural simple sugars in abundance, so there's no need to use molds to convert the complex carbs first. Accordingly, the flavor of wine comes in large measure from the grape juice and skins, along with the methods used to tease the wine out, not mainly from the microbes. In making sake, the microbes and the technique are much more pronounced in the flavor of the final product.
Grapes provide a range of powerful flavor profiles--from Sauvignon Blanc to Syrah--while sake rice provides a more subtle, narrower set of foundation flavors. Sake might be most comparable to Chardonnay in the fact that this grape, by contrast to almost any other varietal, shows the least character on its own but get enhanced and molded by the maker's choices and technique most assertively.
Range of Sake
Sake may start with a narrower palette of raw flavor profiles, but that doesn't stop the innovation. Brewers across Japan use different techniques and timing to achieve dramatically different results. Unfiltered nigori sake, for example, has rice particles suspended in the final product, lending a sweeter, more robust flavor and more textured mouth feel. Daiginjo, by contrast (a highly refined grade of sake), uses almost perfectly neutral rice starch and lots of filtering to produce a very subtle final product.
If you're looking for a place to start exploring sake, take yourself and one of your best dinner companions out to a good sushi bar and order a junmai to go with your meal and nigori for after. After that, you're on your own.
Friday, September 8
Milk Please, Fermented not Spoiled
 I recently toured the Straus Family Creamery dairy farm in Tomales Bay, an area in northern California most famous for unparalleled farmed oysters (the Hog Island Oyster Company) and the San Andreas fault. Straus is also a happy anomaly and attraction in the area, garnering attention for its pioneering (literally, they were one of the first) organic dairy farming practices as well as its truly amazing milk, cream, yogurt, butter, and ice cream.
I'm not going to do another "atta boy" article about how Straus is doing things right by stewarding the land and making a profit (although after you hear their pitch, you get this feeling that doing elsewise is just loco as well as irresponsible). Instead, I learned a great deal about cows and making yogurt, and that's what this post is about.
What Is Milk? Why do we care?
Let's not forget, milk is what cows feed their young. For this reason, it contains a mix of nutrients, sugars, and fats balanced for nurturing calves that's also (and very fortunately) a versatile raw material for making a huge range of wonderful foods. After years of careful selection, cows have been transformed from efficient grazers into extreme lactators. If lactating were a sport, Holsteins would win for their productivity, and Jerseys for their higher butterfat content. Straus uses a mix of both breeds to balance their herd.
A Quick Bit About Organic
Unlike conventional industrial farms, Straus feeds their cows exclusively on organically fertilized pasture grass, organic silage (carb-rich green plants), and some extras like corn, peas and soybeans. Since this blog has been obsessed with all kinds of fermentation processes, I'll just take a moment to say that silage is fermented green grassy plants and legumes often including grass, sorghum, oats, vetch, and alfalfa.
To make silage, fresh plant material gets chopped, packed tightly into a pile, and covered. The moist, anaerobic environment incubates acetobacter and lactobacter perfectly, which digests the complex carbs and sugars. As the digestion progresses, the pH lowers (acidity rises) to a point where unwanted rot can't get started. At Straus I had the opportunity to smell the fermenting silage. It was unmistakably vinegary. Cows find it appetizing, and why not?
Yogurt is Spoiled Milk
Not everyone likes milk--on cereal or otherwise. I happen to be one of these people. Ice cream, yogurt, cream, and butter on the other hand, are entirely different stories. Yogurt has great advantages, however, because it lacks lactose (which can cause distress if you're unable to bust it up in your gut), tastes great, and it comes in fat-free varieties.
To make yogurt, you have to start with pasteurization. Everybody knows milk gets pasteurized to kill unwanted bacteria, but what you may not know (I didn't) is that there's more than one method--and the method impacts the flavor. At Straus they heat their milk to around 161 degrees for 15 seconds, then quickly chill it; it's the second slowest method that's considered safe. In most commercial milk production operations, by contrast, milk is heated to 191 degrees or hotter for as little as a second. According to Straus and many other experts, the higher heat deadens not only the dangerous flora, but the delicate flavors, so slower is better.
After pasteurization, the milk gets inoculated with helpful lactobacter and other friendly microbes--there's a "weeding the garden and replanting" metaphor in there somewhere, and the happy outcomes are many: digestion of the lactose in the milk, flavor development, and texture changes.
Yogurt and Silage Have a Lot In Common
In the same way that the lactic acid prevents unwanted spoilage of silage, the low pH of yogurt protects it from unwelcome bacteria getting a foothold. This doesn't mean yogurt is bullet proof. In the words of our Straus tour guide, and I paraphrase, "You can't technically spoil yogurt, because it's already spoiled, but you can spoil it more if yeasts and molds get in."
In addition to controlled spoiling, the acidity denatures (basically cooks) the milk proteins in a consistent and orderly fashion, causing them to tangle and thicken the texture uniformly. In another recent post I talked about denaturing proteins in relationship to tenderizing meat, so if you're interested check it out.
Manufacturing Matters
Thickening via acid, however, only takes the texture so far. To get that creamy mouth feel that separates yogurt from kefir, especially in non- and low-fat varieties, additional steps are required. In commercial manufacturing processes, milk solids in the form of dried or evaporated milk, gums and pectins are added. There are even laws governing total milk solid percentages.
The upshot? If your yogurt is bouncy, super shiny, or sticky you're most likely eating tree sap or pectin along with powdered milk. Most commercial yogurts are fermented right in the little cup that you buy, so everything has to be in the mix when the cup's filled. It's easy to see why they might want to use thickeners to ensure a consistent--if not totally desirable--end product.
At Straus, rather than making the yogurt in the cup, they make it in a vat. Instead of adding non-dairy thickeners or powdered milk solids (which are scarce if you're looking for organic sources), they reduce the water content through a process called reverse osmosis. Aside from being an interesting tidbit that won me a free quart of yogurt in a friendly "pop quiz" at the end of our tour, you care about that fact for one good reason: it's one of the best ways to extract excess water without changing the flavors because there's no heat involved. And heat, as we discussed in the pasteurization part, deadens the flavor of milk.
Reverse osmosis is really just superfine filtering--mainly water passes through a semi-permeable membrane, but most everything else doesn't. This concentrates the milk solids, increases the thickness, and does no harm to the taste of the milk.
Try Some
If you want to try Straus product, look for it at Whole Foods or other uppity and/or swishy food sellers. Straus costs almost double it's conventional counterpart so get ready for sticker shock. In my mind, though, the care they take of their herd, their land and nearby Tomales Bay, added to the truly remarkable quality of their products, makes it more than worthwhile.
Thursday, August 24
No Syrup is an Island
 If you were like me, when you were little you got a big charge out of dad making you a Shirley Temple or Roy Rogers while the grown-ups were sipping Martinis and lounging in their Pucci's and Sans-a-Belts on the lanai. Or even better, getting one from the bartender at the local steak house.
The fancy glass tumbler with no Hamburgler or Scooby on it, the especially slim straw, and the flamboyant cherry were as intoxicating to the 8-year-old me as the booze was to my parents and friends. And while as an adult you may have turned your back on sugar-and-color-doped Ginger Ale or Coke garnished with a radioactive cherry, the occasional Tequila Sunrise or Planter's Punch on a hot afternoon can be perfect. Key to all of these alcoholic and non-alcoholic confections is grenadine syrup.
The Origin
The name grenadine derives from the French word grenade, meaning pomegranate, and true grenadine syrup is made from its acidic and slightly tannic juice (although in its corner-store incarnation, it's little more than citric acid, corn syrup, and redness). At the end of this post, you'll find a recipe for making your own . If you have any love for pomegranate, give it a try: it's not hard to make, and the result is completely different from what you buy in a bottle at the liquor store. If you want the good stuff but don't feel like having pink fingers for three days, you can also try #8 on the product list of the Sonoma Syrup Company.
What's in a Name?
The name doesn't, as you may have heard, derive from the name of the Caribbean Islands, the Grenadines, nor does it originate from some complication of their southerly neighbor, Grenada (that was the island on which Reagan declared a "noncombatant evacuation operation" to "save" medical students in 1983). One unsubstantiated theory holds that French explorers found the shape of the island to be reminiscent of a pomegranate. And while there's a potential legal fight a-brewing over which island might get to call the product "Grenadine Syrup" with a capital G (if either Grenada or any of the Grenadines ever decide to manufacture it), grenadine isn't currently made anywhere in the Caribbean, nor are pomegranates grown, which require cooler climes to flourish.
The Pomegranate
Pomegranates are the fruit of a shrubby deciduous tree and were brought to Europe from Asia via the Roman empire. They were subsequently toted to the new world by the Spanish, and as a result, can be found in lucky backyards across California and other temperate states. They've got tough rinds, which were once tanned and used for leather by the Romans, and curiously (and uniformly) bear 840 seeds per fruit. They're related to the tree that bears Allspice (the Pimenta tree), Syzygium that bears clove, and the Eucalyptus tree--a very flavorful family indeed.
Making Grenadine
Before diving in, here are a few notes and observations about recipes you're likely to find. Many call for putting the pomegranate seeds into a blender or food processor. This method releases juice, but pomegranate seeds are fairly bitter, and the more you abuse them, the harsher the resulting effluvium will become. Not necessarily a bad thing, but something you may want to watch carefully if you decide to use a machine.
If you want to limit seed damage, the best approach is to mix them in a bowl with sugar, cover with saran wrap, and press the mixture patiently with the bowl of a ladle or the bottom of a mug. Put it in the fridge overnight to macerate, then press the sugary pulp through a strainer to capture the juice and separate the seeds.
Homemade Grenadine
For this recipe, you'll need a strainer with fine mesh, or a regular one with cheese cloth added, although it will absorb some of the precious juice. Also, you may want to wear latex gloves or your fingers will be pinkish for several days.
Take two large pomegranates, split them crosswise and remove the seeds with a dull paring knife. Be careful not to grab any of the pulp, which can be bitter. This is a long and tedious process--I won't lie to you.
Mix the seeds (all 1680 of them) with a cup of sugar in a medium mixing bowl. Cover the seed and sugar mixture loosely with saran wrap and then pound with a solid ladle, a hefty mug, or similar object until the seeds break and the mixture becomes pulpy. Next place the whole thing in the fridge and forget about it overnight. The waiting is key.
Run the pulp through a fine mesh sieve or a larger mesh with cheesecloth to separate all of the juice from the seeds and pulp over a saucepan. When you've gotten as much juice as you possible can out of the pulp, add a half of a cup of water and heat on low. Raise the temperature to 200 degrees (keep it below the boil) for 15 minutes to kill any bugs, cool, bottle and refrigerate.
Best Tequila Sunrise
If you think you like this cocktail now, wait until you try it with homemade grenadine. For this recipe, you'll need ice and a highball. Use any tequila you like--the high sugar and acid content of this drink will cover an average tequila's tracks pretty well. But then again, good tequila is good tequila.
2 oz Tequila
4 oz Orange Juice
1 oz Delicious homemade grenadine
Fill the highball with ice and pour the tequila and orange juice over the top. Stir and let things settle for a couple of seconds. Now dribble your homemade grenadine into the glass over the back of a spoon. The heavy syrup will collect on the bottom and slowly spread color up through the orange juice, creating the sunrise effect.
 Save This Page
Monday, August 14
Try a Little Bitterness
 New York City's Pegu Club proves that bitterness has its place, and it's in your cocktail glass. Along with napkins and swizzle sticks, Pegu's bar proffers vials of flavorings, including a variety of bitters as cocktail condiments. When splashed judiciously into gin, rum, or whiskey drinks, bitters can add mystery and interest for the nose and greater depth across the palette. Pegu patrons are encouraged to customize.
What's Bitter?
Bitters are a branch of the family of loosely related herbal and fruit alcohol infusions called liqueurs. Concentrated bitters are used as flavorings for other things, while sweeter, lighter ones survive mainly in Europe as meal-starters called aperitifs. The herbal contribution to the bitter liqueur may be achieved by literally soaking herbs in alcohol, or by distilling them to some degree or another along with other ingredients.
Bitters intended to flavor other things can be up to 45% alcohol and come in small shaker bottles. The best-known brands, Angostura and Peychaud, get their punch from an alpine flowering plant called gentian. You may have had the pleasure of gentian without realizing it: it's that potent, vegetal flavor in Moxie cola (the original one). There are many other kinds of bitters, including some made from orange peels, maraschino cherries, and anise.
Sidebar: There's a rumor that Angostura bitters contains extract from the bark of a tree of the same name. Not true, claims the manufacturer and Webtender. Rather, Angostura is the name of the town in Venezuela (now Ciudad Bolivar) where it was invented in 1824 by Dr. J. Siegert, a German adventurer who spent 4 years concocting it in order to bolster the vigor and stamina of his troops.
Meal Starter, Ailment Stopper
Aperitifs, literally "openers", are traditionally consumed prior to a meal in order to prepare the mind and body for nourishment. According to Harold McGee, there's evidence that alcohol does in fact stimulate digestive accuity, and the romans employed this philosophy with gusto. Campari and Vermouth are both examples. The most shockingly strong one--at least in my experience--is Cynar, an Italian, artichoke-based liqueur that's dark green and menacing (but in a good way) on the palette.
How to Use Bitters
Bitters of the concentrated flavoring variety are commonly used in cocktails, the best known of which are the Manhattan, Planters Punch, and the Old Fashioned. But here's one you might not have tried. It's perfect summer-cocktail fare based on one of my favorites, the Mojito, but with a dark rum, Carribean twist.
Best Mochito Recipe
For this recipe, you'll need a collins glass and a muddler.
Ingredients:
1 Lemon half
Five or six fresh, lush, large mint leaves
4 ounces of dark, Jamaican or Trinidadian rum such as Mount Gay or Myers (for a complete list, check out this helpful About.com rum round-up)
Ice
Soda water
Angostura Bitters
Juice the lemon half into the pint glass and add the rind. Add the mint leaves and muddle well. The mint leaves should be darkened by being bruised but not in pieces. Next add ice, rum, and then fill the collins glass with soda water and shake 8 drops of bitters onto the top. Enjoy!
Tuesday, August 8
Yucky, Sticky Homemade Ice Cream
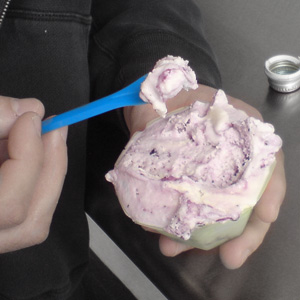 During the warm summer months, gadget retailers trot out their latest colorful, charmingly designed home ice cream makers. The price point is usually around $40-$50, and they consist of three main parts: a tub or ring you put in the freezer, some kind of paddle for churning, and a motor housing.
Unfortunately, the finished product you get from these machines is usually somewhat sticky from the standpoint of texture and "muddy" flavor-wise. If you're looking for a super clean, crisp peach or raspberry fruit flavor, for example, don't bother with these devices. Here's why.
Eggs
Check out the recipes that come in the box with one of these inexpensive home machines. You'll find titles like "French Vanilla" or "Chocolate Decadence." While many of the ingredients may vary, they all typically call for egg yolks, or start with a base that contains them (which explains these purple references to richness). Unfortunately, egg yolks also contribute egginess, which when paired with vegetal and delicate flavors, can be a questionable virtue. So why do we need egg yolks, anyway?
Creamy, Not Crummy
From a “what’s in it” standpoint, ice cream is simple: cream, sugar, and flavorings (in home recipes, those ever-present egg yolks, too). To some degree, however, the ingredients aren’t really the most important thing; it's how they hold themselves together when frozen and churned. The spinning blade and freezing cold transform the structure of the parts into something that's truly noble: smooth, melting, and velvety. And as many of us are painfully aware, fat delivers flavor very effectively. Whether it's in Doritos or ice cream, the fat makes it good, and ice cream has plenty of it: about 10-20% milkfat.
What's Up in the Tub?
Technically, ice cream is both an emulsion (things that don't want to hang together are cajoled into it, such as in creamy salad dressings or plain milk) and a foam (things that contain tiny bubbles trapped in a membrane that won't let them easily escape, such as in whipped cream and beaten egg whites). To you and me, this boils down to a luxurious mouth feel, a unique texture that has body yet melts away perfectly, and a wallop of flavor on your milkfat-lubricated palette.
The presence of the sugar and salts naturally occurring in the cream mixture makes it impossible for all of its water to freeze, just like salt on the driveway. Some of the water in ice cream remains liquid, and the fat from the cream, lubricated by the liquid water, jostled by ice crystals, and beaten mercilessly by the churning blade forms a network of loosely confederated fat droplets. This network is key: it creates the structure of the ice cream, and provides the to-die-for texture.
Why Yolks?
Most homemade ice cream recipes start with a base that calls for cooking egg yolks with cream at very low heat to create a thin custard. After being cooled to refrigerator temperature, this custard gets churned. Cooking is advised to sterilize the raw egg, but if you buy pasteurized eggs, this step really isn't necessary.
Fat and water magnetically repel each other in their natural state (think oil and water). However, when egg yolk is added, it acts like free cocktails at a work party, allowing the fat and water to sit next to each other without undue stress. Without this ambassador of molecular peace, all kinds of havoc can take place, including separation of the ingredients and poor texture. The problem, of course, is that egg yolks also contribute plenty of eggy goodness (or badness, depending on your tastes) and additional fat.
Getting Around the Eggy?
In commercial ice cream, the job of emulsifying is entrusted to chemicals like Polysorbate 80, which contributes little or no flavor. There's also quite a bit that can be done from an industrial process perspective, such as super-fast and super-cold freezing to regulate the formation of ice crystals. These methods simply aren’t available in the average home, although some machines, such as this Cuisinart model, do a better, faster job of freezing (they cost around $250) than the usual sort.
The bottom line? If you're looking for something clean on the palette to carry the fruit, tea, or other delicate ice cream flavors you've been dying to make, you might want to look at something more expensive by way of an ice cream maker than the typical summer special unit. If you like French vanilla, caramel, chocolate, or other flavors that harmonize with eggs more cozily, go ahead and get that home ice cream maker. They're also good for sorbets and ices.
Thursday, July 27
Petal Lust
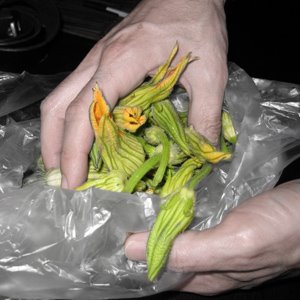 Flowers look great on the dining table--deep fried, dragged in melted butter, or arranged on a field of salad greens or a cool frosting plateau.
Prickly Situation
Artichokes, also known as Globe Artichokes, belong to the same family of flower as the Scotch Thistle. The base of the inner leaves and the cup-like structure that supports what eventually matures into a giant thistle-like flower (the heart) are the parts you eat. The mass of filaments packed on top of the heart, the choke, is the part that blossoms, and has to be scooped out in larger specimens before eating. In small artichokes, you can simply trim off the fibrous leaf ends and eat the entire thing, choke and all.
Squashed Hopes
Squash blossoms are the flowers of the zucchini and summer squash. These vegetables are technically fruit, just like the tomato, because they are the seed-bearing structures of the plant. There are also male blossoms, which can be harvested and eaten without reducing your crop. You can tell the male blossoms by their thin stems. Female blossom stems are thicker. Squash blossoms are often lightly battered and deep fried, sometimes with a stuffing of some kind. But they can also be sauteed simply with butter. They have a delicate, fresh squash-like flavor and aroma.
Fast Food
Technically not part of the lily clan (such as tiger, easter, etc.), daylilies bear a superficial resemblance to their more ornate doppelgangers. Daylilies open their flowers during the day only to have them wither at night and replaced the next day by fresh ones. Their dried flowers are used in Chinese medicine as well as cuisine such as hot and sour soup and mu shu pork. True lilies such as the tiger lily are poisonous to cats. Daylilies are not.
Strike the Posie
There are a bunch of flowers that you don't cook, don't have a lot of flavor, but sure dress up that bag of prewashed salad greens you're serving to the wife's boss. Nasturtium, pansies, rose petals (white part removed), and pot marigold petals are just a few of these varieties. One warning: although they look gorgeous, pesticides are employed with reckless abandon on flower farms, which is bad for both the environment and the people who have to work there. So be sure you're buying organic flowers to feed your family and friends, not the kind from the local flower shop.
Saturday, July 22
Love Me Tenderized
 It's grilling season and, although I've vented my spleen on gas grills already, as my friend Bob pointed out, "roasted meat is roasted meat, and it tastes good." No doubt.
To make that grilled dish even better, many believe that marinading is the logical pre-step. After all, bottles of the stuff line store shelves and you can even find devices to inject marinade literally into the roast or chicken breast. On top of all that, recipe after recipe for grilled food calls for marinading with the word "tender" sprinkled liberally throughout. Not so, say the experts...it's time for some tough love about tender.
The Truth About Tenderizing
Marinades—at least the acidic kinds—don't tenderize protein foods like meat, they actually cook it. You know how fish turns white in lime juice (think Ceviche)? Acid denatures the protein, which basically means it busts up the natural, tidy structure leaving behind a chaotic mesh of protein strands.
Depending on how much acid is involved, this bramble bush of protein can become tough. Cooking with heat also denatures protein, and like the acid in the marinade, it's a matter of degrees. Too much acid, like too much heat, renders meat tough. So go easy on the acid in the marinade...there's really no tenderizing happening there. What's more, unless you're injecting your meat, all the action is really taking place only on the surface anyhow.
Tropical Teasers
But what of pineapple and papaya juice? Doesn't all that exotic tropical fruit work magic on meat to make it tender? While you could say meat treated with the natural enzymes in pineapple and papaya definitely make meat softer, tender would be a stretch. Subjecting meat to an enzyme bath is more like leaving your cake out in the rain...definitely softer, but not very appetizing. Yuck.
Dairy Delusions
Another popular tenderizer—for chicken, at least—is yogurt, milk, and buttermilk. It's theorized that if any tenderizing is taking place at all, it may be from calcium in the dairy triggering enzymes already present in the meat. Questions remain about whether this is really what's happening. The only other obvious component that could be doing anything would be lactic acid in yogurt or buttermilk, and as we've already seen, acid doesn't really work.
Isn't the proof of the pudding in the tandoor? Tandoori chicken is marinated in yogurt, and there's no doubt that texture on the skewer didn't arise from the tandoor alone. The reason, however, may not be the yogurt. These marinades usually call for lots of ginger, a root that contains enzymes (a la pineapple and papaya) that could be doing the same softening.
Are Marinades Good for Anything?
Chris Schlesinger chef of the East Coast Grill, ex-chef of the Blue Room (both Boston favs) and author of "The Thrill of the Grill" advocates dry rubs over marinades. The reason is simple: dry rubs impart more intense, concentrated flavor without any of the negative side effects associated with acidic marinades. You'll use a bunch more oregano in a dry rub than you would ever put into a marinade.
However, if you keep the acid level low enough to avoid toughening your meat, marinades can certainly flavor grillables. And a small amount of acid sets the stage for a more productive, voluptuous browning to occur in the heat of the grill, oven, or pan.
Monday, July 17
Brown All Around: From toasting to tanning.
 Brown food is all around us, from toast to roasts, coffee, tea, and chocolate: we associate rich brown color with delicious, complex flavor. This fact is not lost upon General Foods and its friends occupying the supermarket freezer case; if there was ever a phrase wheezing from the strain of marketing fatigue, it has to be "golden brown" (followed by "zesty").
But apples also turn brown after being sliced (without any benefit to flavor), as do potatoes. Sugar, on the other hand, can become brown and delicious. Tea leaves (black tea, at least) are green when harvested, but they're brown in the tin, and certainly delicious. Browning, it turns out, is the result of at three separate processes which can also contribute to flavor.
The fortune of the French fry.
Bread, raw meat, coffee beans, potatoes, and raw cocao (to name just a few) undergo changes when heated that make them brown as well as more delicious. This process is called the Maillard reaction, named after the not-widely-known French physician and chemist, Louis Camille Maillard. In addition to figuring out some important things about how your kidneys work, Maillard also discovered that amino acids and sugars found in food react with each other (under certain conditions, as, for example, when heated to between 300 and 500 degrees Fahrenheit in your oven or dunked in hot fat) to produce a whole bunch of new components, some of them brown in color.
Fortunately, these same processes can also make foods taste better. Roast beef, maple syrup, and hash browns all benefit in both appearance and flavor. The next time you put that burger on the grill or take a sip of coffee, you can thank Maillard for figuring out why your food looks and tastes so rich. The burger alone will be throwing off about 600 separate aroma components after undergoing Mr. Maillard's reaction. While you're in an appreciative frame of mind, you may as well thank him for your that fake tan you got for your best friend's wedding...the chemicals in spray-tan react with amino acids in your dead skin cells, turning you--like your toaster waffles--golden brown (fortunately no heat is required for that particular reaction to take place).
Not so good browning...but still, nice tan!
Ever noticed how unappealing your artichoke, apple, and potato slices look after just a moment or two of sitting out on a plate? The yellow-brown color these foods quickly take on is the result of another process called enzymatic browning.
Oxygen reacts with chemicals in fruits, vegetables, tea, and even tobacco leaves, called phenols (phenols are the healthful anti-oxidants that we're hearing so much about, although I wouldn't go looking for them in tobacco) to produce new brown compounds called melanins. On apples, this oxidation doesn't help the flavor, but on tea, it does. And yes, you guessed it, melanins produced during enzymatic browning are in the same family as the melanin you learned about in high school biology class, the one your body makes more of during sun-tanning.
Fortunately, it's relatively easy to control undesirable enzymatic browning. Adding lemon juice to your apples or avocado pieces destroys the browning pre-cursors, as will depriving your food of oxygen by throwing those sliced artichokes into a bowl of water. Industrial salad bars take the same oxygen-deprivation approach by liberally sprinkling sulfites onto their shredded lettuce. If you think wine's bad, consider that salad bars have literally thousands of times more sulfites added to prevent browning.
Carmelization, no tanning involved.
This type of browning does not involve oxidation and enzymes, but it does involve sugar voo-doo, making it more akin to the Maillard reaction. Unlike the Maillard reaction, no amino acids are required to make carmelization happen. The sugar takes leave of itself, producing melanins and new flavor components, just by adding heat.
Friday, July 7
Chocoluv Part 2: Tasting everything.
 Temper, Temper...
In part 1 of Chocoluv, we traveled the road (briskly, mind you) from cocao pod to cocoa and chocolate. And while we're on the subject, notice the swapping of the last two letters from [c-o-c-a-o] to [c-o-c-o-a]. Cocao (pronounced ka-Cow) refers to plant and its parts, while cocoa (pronounced Co-co) refers to the food product either in the form of powder or as a component of chocolate, as in 'cocoa butter.'
Once the fermented, roasted chocolate nib has been super-finely ground in the chocolate manufacturer's conch, it's essentially ready to be made into bars: both eating bars, and ingredient-for-other-confections bars. However, there's one last thing you need to know before we get to the actual eating, and that's the process of tempering. Although it wouldn't kill you to remain unaware of tempering, knowing about it will explain both why professonal chocolate bars are glossy, snap nicely, and melt in your mouth...as well as why the chocolate covered strawberries you make at home always turn out so damn sticky and dull.
Tempering involves the controlled warming and cooling (and warming and cooling again) of chocolate in a way that encourages the cocoa butter to become uniform in structure. Cocoa butter, the fat that holds the ground up nib in suspension, forms crystals as it cools to room temperature. There are several kinds of crystals that it can form, but the best for chocolatiers are those that happen at around 88 degrees farenheit, but only after all the other types of crystals have been melted thoroughly away. Once the right sorts of crystals get a solid start, subsequent cooling (and crystal formation) should spawn more of the same. If done correctly, the end product has a melting temperature that's just slightly below body temperature, perfect for creating that 'melt in your mouth' experience, and as an aesthetic side benefit, leaves a glossy shine and satisfying snap.
Those sticky strawberries? The chocolate got too hot in the double boiler and broke the temper of the chocolate. To avoid that problem, heat your chocolate very slowly and gently and remove it from the heat before the last few lumps melt completely. Keep stirring. Most likely, the last few lumps will melt eventually, but even if they don't, go ahead and coat your strawberries...this slow, gentle method preserves the temper.
Now to the Good Part: Tasting
This is the part of the blog that you can crib for hosting your friends over for a chocolate tasting. There are many resources for chocolate tasting wheels, charts and tables, but here's a short and sweet guide, cribbed itself mainly from McGee:
Remember all those complex reactions I mentioned in part one that take place during fermentation? Well here's how they manifest in your mouth:
Taste for bitterness and astringency. Those characteristics come right along with the bean. They're from compounds that the bean produces naturally, in part to fend off pests. Some of these get destroyed or removed by the fermentation, roasting, and conching processes, but not all. Caffeine, it turns out, is one of those (whew!).
Taste for fruit, wine, and vinegar flavors. These complex undertones result from the sweet pulp having been fermented. The acids and alcohols that are produced as the pulp transforms from plant food to chocolate pre-cursor leave behind complex flavors, just as they do when wine grapes are fermented. As the bean itself is decomposed and digested by the various helpful microbes in the fermentation process, almond and dairy or flowery notes may arise.
Finally, check your taste buds for the nutty, carmel, earthy and charcoal flavors that arise from the roasting process. Just like coffee, nib that has been roasted more intensely will taste more burned and charcoal-like with stronger caramel overtones. There are roasting styles for nib, just like there are for coffees.
What to Taste, or Who?
There are lots of great new producers out there to sample. My advice is to try a few of the big names like Scharffen Berger and Callebaut for reference. These are the bars that will be very consistent from year to year, and probably not too challenging. Then move on to more focused, interesting micro-producers whose tastes and the character of their cocao sources really come through.
Here are a few names. Get a bar from each when you shop:
El Rey (Venezualan single origin beans)
Michel Cluizel (French maker)
Grenada Chocolate Company(organic and fair trade maker)
Valrhona (single origin bars)
Casa Don Puglisi (vegan and beautifully presented)
Simple Tasting Steps
These steps were first revealed to me by SF local chocolate purveyor Adam Smith, who runs a fantastic little shop called Fog City News. I was lucky enough to attend a staff tasting, and here's what I learned:
1. Unwrap the bar and check it for shine. You're seeing the results of tempering
2. Snap a piece off...did it snap nicely?
3. Smell it. Can you detect any of the flavor notes mentioned above? Think about flowers, fruit, spices...see if the chocolate reminds you of anything.
4. Take a bite and let it melt. As the chocolate temperature rises in your mouth, it will melt and throw off even more aromas. How intense is it? How sweet?
5. Repeat!
Where to find it?
Chocolate trade is surging, so it's easier to find high quality product than ever. In San Francisco, where I live, Fog City News and Bittersweet Cafe are two great places to try. Fog City carries over 200 bars and they do chocolate tastings on a regular basis with the staff so they're well stocked and informed. Bittersweet also has a wide selection and performs organized tastings. I attended a tasting that was really interesting and informative. If you're in SF with a group, I recommend it.
I invite you to join the chocoluv party...where do you get chocolate in your town?
Thursday, July 6
Chocoluv Part 1: What's in the pod, man?
 Like almost every aspect of the discretionary food marketplace, the roving spotlight of attention and global commerce has lighted upon chocolate. Not unlike the way that coffee went from donut companion to centerpiece, chocolate has matured from waxy drug-store candy "treat" into a full blown lifestyle option. Aficionados regularly discuss varietals, single origin products, and celebrity (minor, though they may be) producers.
But What is Chocolate?
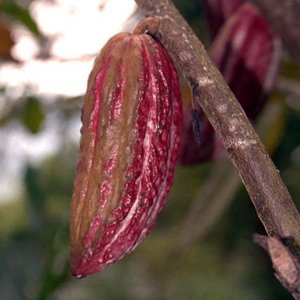
Chocolate as we know it is really nothing more than super-duper finely ground, fermented, roasted beans (seeds) of the cocao tree suspended in cocoa butter (fat) with sugar, and sometimes flavor like vanilla or milk.
That statement, accurate though it may be, is akin to saying that wine is nothing more than fermented grape juice. The road from pod to bar is a long one with twists and turns that will leave you scratching your head wondering how anyone ever found the way. And the truth is, of course, that nobody figured it out...it took many people quite a long time.
Pod Love
The cocao tree, a shade-loving amazon forest floor native, produces very unpromising, mini-football-size-and-shape pods that look, smell, and taste like they have little to offer in the way of good eats. There are mainly two types of cocao trees fueling the chocolate trade: criollo, and forastero. Criollo, though finicky and relatively lean producers, yield the most complex flavors in the finished product. Think of them as the Pinot Noir of the cocao world.
Forastero trees, on the other hand, produce the most reliable and bountiful crops. They're the Chardonnay of the chocolate world: they grow in a variety of conditions quite well, and they don't have that much flavor on their own. Hershey, Nestle, Cadbury, and Mars buy this cocao from plantations in West Africa, eventually making its way into your favorite vending machine.
The Process
After harvesting, pods are literally gutted of their pulp and seed contents which are piled into heaps. Soon, wild yeast ferments the natural sugars in the pulp into alcohol. Alcohol level rises causing the yeast to die off, and setting the table for bacteria which then consumes the alcohol, converting it into lactic acid. The lactic acid is transformed yet again by another sort of bacteria into acetic acid--a miraculous chain of events that roughly follows the pattern that grape juice does as it first turns into wine and then finally to vinegar.
Fermentation awakens flavor pre-cursors dormant in the pulp and seeds by exposing them to the alcohol and acid. Without fermentation, chocolate simply isn't possible. Squiring this process to success requires skill and attention, and it also has to be stopped at the right point. Arresting unwanted microbial activity is accomplished by spreading out the transformed beans in the sun to dry.
From Beans to Bar
Dry, fermented cocao beans must be roasted and their casings discarded. This produces 'nib,' which is really the first product along the way that begins to taste like actual chocolate. Nib is ground and refined into a paste called chocolate liquor. At this stage, producers can go in two directions: they can extract away the cocoa butter, leaving behind cocoa powder, or they can add cocoa butter to create a richer paste that can be transformed into the chocolate we know and love.
To make chocolate, the enriched chocolate liquor is ground even further in a machine called a conch (because it looked, in its first incarnation, roughly like the shell of the same name). The conching process tumbles the chocolate liquor much the same way that concrete gets tumbled in a cement truck. Ball bearings in the conch pulverize the beans into particles so tiny that our tongue can no longer detect them. The heat created from the friction of all that tumbling further transforms the chocolate liquor by encouraging unsavory volatile organic compounds to waft away.
Unlike industrial producers, or even small makers in Belgium and Germany, there's a whole crop of producers in South America who are growing their own pods and manufacturing the finished chocolate all in one place. This is a relatively new phenomenon, and one that's great for chocolate lovers. Although the europeans developed what we now think of as chocolate, the confection, small producers have gone to chocolate school and they're doing it for themselves.
Stay tuned for Part 2 where I'll talk about what to taste for, who the players are, and where to lay your paws on a bar or two.
Sunday, July 2
The Trouble with Truffles
 One of my most treasured memories is having mushroom soup at a restaurant in Reading, Pennsylvania called Joe's. After the soup was served, the waiter garnished it with a ribbon of crème frâiche in the shape of a mushroom. Hokey no doubt, but the soup, which was made with wild mushrooms expertly harvested from the local Reading hills, was aromatic, earthy, and intense.
The origin and evolution of Joe's restaurant is a fascinating slice of American culinary history, and the latest of Joe's progeny, grandson Jack—along with wife Heidi, now run the Joel Palmer House in Oregon. They carry on the great fungi food tradition that began in Reading by harvesting their own mushrooms. And the soup? It's on the menu for eight bucks. I don't know if they garnish anymore.
What's a mushroom?
Mushrooms are the "fruiting body" of certain types of fungi, and by fruiting body, I mean the nibbley bit: stem and cap. The biological purpose of the mushroom is to cast spores to the prevailing wind from gills located on the underside of the cap, or in the case of morels, from the many folds on its surface.
The 'mother fungus' that produces the mushroom lies beneath the surface in the form of a network of delicate filaments (called hyphae) that interlace with the soil, extracting nutrients. According to Harold McGee, there can be as many as 2000 meters of hyphae in a single cubic centimeter of soil beneath the visible mushroom...that's a lot of hyphae.
Unlike plants that photosynthesize their energy from the sun, mushrooms take it from the soil, from the decomposition of other plants, or from host plants. Shitake mushrooms are cultivated on oak logs, for example, which also accounts in part for their distinctive flavor.
Many mushrooms are poisonous, proving that the best defense is a deadly offense. By deterring animals from eating their spores, these fungi stand a better chance of scattering them to good effect. Paradoxically, the safely edible ones taste good to us because, in part, they naturally produce the flavor enhancer most often associated with chinese take out, MSG.
Truffles, A Whole Other Matter
Truffles are related to mushrooms in that they're both fungi, but rather than casting spores to the wind, truffles use their intoxicating aroma to call almost anything with a nose to the dinner table. When they're most ripe, these hard-shelled fungi release a powerful mix of chemicals that rodents, deer, pigs, and even dogs find (as we do) hard to resist. They eat the truffles, taking the spores on board, and deposit them elsewhere.
Interestingly enough, the siren smell of truffle includes androstenone, a male hormone found in armpit sweat (this also according to McGee), which might be why some of us find it so fascinating, while others literally turn up their noses.
Unlike other mushrooms that feed on decomposing plant matter, truffles grow within the root systems of oak and other varieties of trees. In exchange for minerals extracted and shared by the truffle, the tree returns the favor with energy produced from photosynthesis. It's symbiotic: everybody wins.
The most valuable truffles, the Italian white Alba and French Perigord black varieities, are definitely the bling of the well stocked larder. White Albas can go for as much as $1500 per pound, while Perigord blacks often fetch $900. For most of us, both the money and connections you need to get your hands on fresh truffles are well out of reach. And that, in a nutshell, is the trouble with truffles.
Thursday, June 29
Where There's Fire, There Should Be Smoke
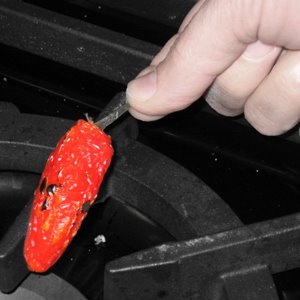
 Beware holding forth on this topic if you're at a barbecue and there's a Dixie cup full of something to drink anywhere within earshot, but it's gotta be said: Propane grills are for sissies. And I don't mean sissy in the fierce, bring-it-on-bitch sense. I mean it in the 'I think I'm an outdoorsy grillin' man (but I'm really just copping-out.)' sense.
Why? Because cooking on propane outdoors is mostly about the pleasure of the person doing the cooking--they get to be outside and it's easier--but this method doesn't really deliver the "grilled" part of grilling to you, your loved ones, or worse, your guests! There are some extraordinary measures you can take to compensate for propane's lack of anything in the way of a contribution to the food except heat, but even on those terms, it can't measure up to the sheer intensity of a charcoal fire.
It's Getting Hot in Here
Break out the Weber and fire up a bag of hardwood charcoal. If you have the industrial thermometer handy, you could be seeing six or seven hundred degrees registering once your fire has gotten going. That's enough to seriously sear anything you might be thinking about putting on the picnic table, from peaches to perch. Using your average Costco propane grill you'd be lucky to get firmly into the high five hundreds.
Besides of its sheer power to sear food tightly, hardwood charcoal contributes flavor and character you can't really replicate with propane. Sure, you could soak the wood chips and put them into a foil tray and put them into the grill so it gets smoky...but if you're the type of person who likes a propane grill because it's a no fuss proposition, would you really go to all that trouble? It's far easier to fire up a true charcoal fire, and you'll be happier with the results.
Why Use Petroleum Near Something You Eat?
Most people object to charcoal because it conjures that square can and a stream of fumey, potentially explosive liquid marketed under the benign and helpful 'charcoal starter' description. Fi! There's a far better, faster, and cheaper way to get your charcoal going.
Smoking Like a Chimney
Chimneys are simply wide metal tubes with a heat-safe handle, and a grate positioned about a quarter of the way inside the bottom end of the tube. The idea is you light newspaper under the grate, and the coals resting above the grate get all fired up. Since all the energy is contained in this compact column, and since heat and flame like to climb, the process goes quickly.
Using this method, you can get coals hot in about ten minutes, and if you stuff the newspaper the right way, it only takes a single match. C'mon, that's just about as easy and fast as propane. Ok so you have to lug a bag of charcoal, but that tank of propane won't fit in your pocket, either.
Tuesday, June 27
Sour Grapes Make Sweet Salads
 Perfect for embalming a sprig of thyme, embracing a pool of extra virgin olive oil, but equally adept at removing even the toughest soap scum, vinegar is one of the most versatile—and one of the oldest—condiments. It delivers a sharp, bracing bite to the tongue and a heady, pungent aroma to the nose.
The same process that ruins wine (in French 'vin aigre' literally means 'sour wine') creates the prized sourness of vinegar. There's a long explanation about how, but in short, there's a family of acetobacter microbes that make their living by consuming alcohol (in the presence of air) and excreting acetic acid.
While this conversion process is a very bad thing for wine, and why so many of those gray rubber stoppers and white vacuum pumps make it to the kitchen tool drawer—it's a very good thing for salads. But acetic acid alone isn't enough to make vinegar delicious. Wonderful vinegars mainly come from wonderful pre-cursor products that have their own flavor profile, and that have been soured in a careful, controlled way, and then stopped just at the right point.
Balsamic, Cider, and White
The character of true balsamic vinegar from Modena, Italy, for example, starts with the boiled down, concentrated juice of Trebbiano, Lambrusco and other grape varieties, providing the sugar for fermentation. After inoculating the concentrate with a microbial stew by the maker, it takes years and years (we're talking up to 25) of additional fermentation in a progression of ever-smaller, wooden barrels of various kinds, each contributing unique character and flavor. The wood for these barrels can be exotic, and the progression is a highly guarded trade secret by the maker.
Apple cider vinegar, the current cash cow of predatory diet 'aid' shysters, benefits from the natural complexity of apples, one of whose components is malic acid. So what, you say? Malic acid is the fuel for another process called malolactic fermentation. This particularly yummy sort of 'going bad' changes the malic acid into milder lactic acid as well as producing, as a by product, the same chemical that's butters up the flavor of chardonnay, margarine, and 'I Can't Believe It's Not Butter'. Good apple cider vinegar, like balsamic, ages slowly, giving the vinegar time to undergo a whole series of reactions, including malolactic fermentation, that enrich and complexify the final product.
On the other end of the spectrum, white vinegar is literally just acetic acid and water. Some large commercial labs create acetic acid from, of all things, propane! Yes, the fuel you use to cook your chicken on in the back yard. While others ferment it from pure alcohol (who knows how they make that!...and while I'm in a parenthesis...note to self: Don't spend any money on 'organic' or 'brand name' white vinegar—it truly matters not!)
Chinese black vinegars made from toasted rice, millet and other grains can have as little as two percent of acetic acid, while red wine vinegars can have as much as seven percent or eight percent or even more. Most vinegars will tell you on the label, but as you can easily see, when you're buying vinegar, you're buying lots of other liquid: some of it delicious, some of it utterly without character.
What About Safeway?
In between the lush, teaming, complex true balsamic from Modena and the barren, stark and harsh white vinegar of Heinz, there lurks a shelf-load of concocted vinegars with leaves, sticks, fruit, coloring, and host of other gimmicks. Unless you explicitly buy vinegar made from apple cider, for example, you're likely just getting some acetic acid, caramel coloring, and maybe a few other additives--you can be sure, there's no malolactic fermentation happening there. So beware of what you buy. If you'll be eating the vinegar on a salad, check the label and weigh how much love went into the process. If no aging has taken place, for example, it's likely the vinegar lacks complexity which can be perfect for cooking, but maybe not naked from the bottle to adorn bread.
Monday, June 26
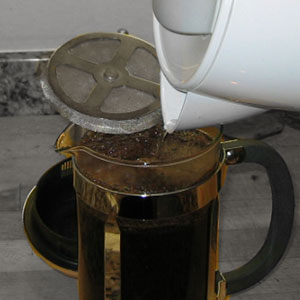
Full Court French Press
 If you like good coffee and you've been using a drip machine, you're in for a treat. And unlike many other treats promised by the likes of Williams Sonoma, Sur La Table and other overheated purveyors of faddish food gadgets, this one won't force you into pilfering the swear jar or require that you build new countertops.
The Freedom Press, err, French Press
The french press, also known as a plunge or press pot, has been around since the turn of the twentieth century. The idea is simple: you put large-grained coffee grounds into a cylinder, add water at around 185 degrees (just off the boil, as they say), wait a few minutes, then plunge the waterlogged grounds to the bottom and pour off the black gold.
It's simple. It's beautiful. It's fun. Your guests will ooh and ahh when you bring it to the table. But it's also super easy to make a lousy pot. Here's how to get the most from your french press.
First, make sure the coffee grinds are coarse. They should be little coffee nuggets, not powder or grains. Coarse salt comes to mind as a reasonable comparison, but then again, coarse salt varies quite a bit, too. I guess you'd have to say the grinds should be larger than drip grind, perhaps even double. To get a good idea, ask for a quarter of a pound ground on #12 at Peet's. You could try Starbucks, too, but good luck finding someone who will know what you're talking about.
And this brings me to the crux of the french press, and for that matter, all coffee preparation methods: get your coffee ground at your local coffee shop daily (ground beans only retain peak flavor for about 48 hours), or if that's not in the cards, invest in a conical burr grinder and buy whole beans to get good results.
The Daily Grind
But what, you say, about that whizzy, small grinder thing I put on my registry at Crate and Barrel? The truth is that those spinning blade grinders are great for making powder from whole spices, they're OK for grinding beans for drip coffee or any method that involves a paper filter, but they're lousy for the french press. French presses use a metal mesh filter that won't remove the tiny, powdery grinds made from the blade grinder. You end up with a cloudy, bitter, not so nice cup.
Really fast spinning blades smash the beans into ever smaller bits and chunks, and worse, they do it unevenly. That's why there's always coffee powder stuck to the bowl of the grinder and lots of oils from the beans transfer to the blades and grinder bowl. The result is chunky coffee bits of all sizes somewhat robbed of their precious aromatic oils. Worse, unless you're assiduous about cleaning your grinder, you'll eventually have rancid coffee oils accumulating that can spoil successive pots.
Burr grinders, by contrast, literally flatten, shatter, and crush the beans as they pass through the grinder. The genius of the conical burr grinder is that the metal parts that do the grinding are positioned one inside the other a small but fixed distance from each other. The resulting coffee grinds are crushed shards of more uniform size that have more surface area. When these jagged shards get into the hot water, there's more oils and aromas on their surface to pass from the bean into your cup of joe.
So, if you drink coffee every day, buy yourself a burr grinder. You'll use it forever, and you can get a decent one for around $100. Not a bad investment in your daily happiness. Just for comparison, that's only one session with your shrink, or about half a pair of fabulous new jeans.
The Actual Making of the Coffee
Back to making coffee with a french press...after you grind your beans with your burr grinder, spoon out about two tablespoons per 8 ounce (normal mug size) cup into your pot. Sounds like a lot of coffee, right? It is, but the results are worth it. Remember the grinds are larger, so there's more airspace between each particle, so it looks a bit like more than it really is. Be good about measuring both the grinds and the water the first couple of times until you get the right eyeballs from it. The big mistake most people make is to use too few grinds and/or too much water.
Next (or concurrently with grinding the beans) boil some water, take it off the heat, and wait a little bit until it cools a few degrees to around 185. Pour the water gently over the grinds in the pot to cover them, swish the pot a little to get all the grinds wet, and then fill it up to the top with water. Place the plunger assembly on top of the pot with the plunging handle all the way up. Wait about three and a half minutes, plunge by pressing down slowly and steadily on the handle, pour, and enjoy.
The only twist to this method that's worth mentioning is that some people use a wooden spoon to stir the grounds around about halfway through the brew. The idea is to circulate some water to make sure all the grinds are steeping evenly and thoroughly. I just plunge up and down an inch or two in the pot and return the handle to the 'up' position, sort of like a washing machine agitator. That methods works well, too. If your beans are fresh, you'll notice a significant 'bloom' of bubbles. This bloom is just CO2 escaping from the beans. C02 is one of the by-products of roasting, and the fresher the beans, the more CO2 will bloom when you brew.
This page has very complete instructions with photos. The recommendations the author makes for burr grinders, however, are out of date. The models he suggests are no longer available, but just poke around a bit and you'll find good ones. Sweet Maria's has many for sale, although they tend to be on the more serious side. You can find cheaper ones if you look around.
Don't forget, used coffee grinds are compostable.
Higher end grinders brought to my attention by my Tab addict friend, Chris.
Mazzer
Versalab M3
Saturday, June 24
Cane-Enabled Cocktails
 The world owes a lot to the reedy, sub-tropical sugar cane plant: hyperactive children, a long history of imperialist plantations, bizarre federal price-fixing laws...a sticky history indeed. But few by-products of this cousin of the lowly lawn grass plant, which by the way can grow as high as 12 feet, are as truly rewarding as their distilled ones: cachaca and rum.
While both liquors come from sugar cane, cachaca is made from fermented and distilled sugar cane juice. Rum, at least ideally, is made from fermented and distilled molasses. Molasses is a by-product of sugar manufacturing that results from cycles of boiling and purifying raw cane juice until it's fit for the queen's 4 o'clock tea service.
Like some high quality wines, high quality, small-batch cachacas and rums are aged in wood barrels. And also like wine, there are industrial, high-volume cachacas and rums that make up in availability and affordability what they lack in depth. Cachaca is one of top four produced liquors of the world after the likes of vodka, rum, and soju.
Now that you've got your muddling game on (see previous posting on muddling), you're all set to make on the best, most classic cachaca cocktail known to man, the Brazilian staple, the caipirinha (pronounced ki-per-een-ya).
Best Caipirinha Recipe
For this recipe, you'll need a serving tumbler, a stainless bar shaker, and a muddler.
1.5-2 ounces cachaca
1 large juicy lime (1.5 small ones)
1 tbs white or demerara sugar
ice cubes
Halve the lime. Slice each half into quarters and place them in a tumbler along with the sugar. Muddle! This will require some solid muddling skills, as you're also juicing the lime along with releasing essential oils from the peel. If you want to do it another way (more like the mojito way) you can juice each half of the lime first into the tumbler, then slice up the rinds and throw them in and muddle with the sugar. Next add ice to the top of the tumbler, cachaca, and shake in the stainless cup. Serve it forth!
Wednesday, June 21
Join the Great Muddle Class
 You may not have affordable healthcare or be able to depend on social security, but you can still join the great muddle class. Muddling is an ignored cocktail foundation technique that makes the Mojito and Caipirinha come alive with essence...of lime, of mint, of lemon. The Old Fashioned cocktail also gets muddled if you're a traditionalist, although since it takes some time to do, most barkeeps skip it. And that skipping has turned into it's own law of style, attracting non-muddling groupies who like the fruit of the Old Fashioned unmolested.
Muddle Through It
Muddling is the gentle but thorough bruising of fruit (or mint) with sugar at the bottom of a cocktail shaker or glass to release juice and essential oils. Once muddled and the glass is replete with this heightened essence, you add alcohol, soda water, ice, and whatever else you need to complete the cocktail. If drunk within the first few minutes after muddling, the happy imbiber gets the full force of the flavors (to wit: the better the fruit or herb, the better the flavor.) The wonderful thing about muddling is that you release the flavor you want without breaking the fruit rinds or mint leaves into tiny, annoying bits that can float around creating both aesthetic and gastronomic unpleasantness.
Here's How to Get the Best Flavor
Muddled drinks at home have the potential to be much better than those made at most bars and restaurants. In commercial bars, they use sour mix or simple syrup (equal parts sugar and water heated gently until the sugar completely dissolves) to sweeten drinks, eliminating worry over dissolution of sugar and speeding up the mixing process. Bars are, naturally, more about speed and volume than about mixing with love. While this adds to the efficiency of the drink-making process, it also eliminates an opportunity for better flavor.
At home, where we rarely take the time to make simple syrup, granulated sugar can be added to the glass along with the fruit before muddling. The sugar, with all of its sweet, pointy crystals, acts as an abrasive medium that increases the efficiency of the muddle. For each press of the muddler (or spatula handle, as the case may be) more of the surface of the fruit rind or mint leaf can be affected and more flavor is released. Take home thought: before you muddle, add the granulated sugar.
How to Muddle
If you're thinking about crushing, piercing, smooshing, or pounding...forget that. The process of muddling is to bruise and press. You want to release essential oils and fruit juice, but not make a mash of the ingredients. Press firmly but slowly and in a controlled fashion that adds all the pressure you want, but doesn't break down the ingredients into mush or bits.
There are all kinds of tools you can use to muddle, but here are a few important characteristics:
- The muddler should have a flat end rather than a round or pointed end...this lets you get more of the surface of the muddler in contact with the fruit or mint.
- The muddler should not be made of any reactive material like aluminum or a plastic that could transfer flavors. Wood is a good choice as long as it's easily cleaned.
- The muddler should fit nicely in your hand and be easy to handle.
- The muddler should be long enough to easily get to the bottom of whatever glass or cocktail shaker you'll be using to muddle in.
Best Mojito Recipe
For this recipe, you'll need a pint-sized bar glass, a stainless bartender's cup, and a muddler.
Ingredients:
1 Lime, halved
Five or six fresh, lush, large mint leaves
2 or 3 Cubes of Demerara sugar to taste (it's a sugar with 2% molasses that comes in handy cubes)
1.5 ounces of rum, preferably a silver rum (colorless) of decent quality
Ice
Soda water
Juice the lime halves into the pint glass and add the remaining rinds. Add the sugar cubes and mint leaves, and muddle. The sugar cubes need to be mostly crushed and will partially dissolve in the lime juice. The mint leaves should be darkened by being bruised but not in pieces. Next add ice, rum, and a splash of soda water on the top. Place the stainless cocktail shaker over the pint glass and turn it over once or twice gently (don't vigorously shake). Separate the glass from the stainless cup, leaving the cocktail in the stainless cup. Pour it all into serving tumbler and garnish with a mint leaf. The undissolved sugar will settle to the bottom, and that's ok. It adds to the rustic charm, and the lucky drinker can choose to mix more in or let it alone to suit their taste.
Friday, June 16
Roast Some Coffee
 I think we've all had enough of Starbucks for now...support the little guy or make your own beans.
Are You Interested In Roasting at Home?
For the brave and curious, roasting at home is definitely feasible. It sort of begs the question, 'Why bother?' in the same way that sewing your own clothes does, but there are home sewers, too. And even though I don't rank myself among the particularly brave when it comes to craft projects, I have tried home roasting.
Check out Sweet Maria's. They've got a huge supply of equipment, information, and reasonably-priced green beans.
I have a home roasting machine from Swissmar called the Bravi. It's a fairly automated machine...you literally load up 8 ounces of green beans, select a roast level and then push the green button. With good quality green beans and several trial-and-error batches, you can turn out a decent finished product.
Careful control over time, temperature, and agitation is key to successful roasting. Guerrilla roasters use hot-air popcorn machines with a hole drilled in the top to insert a thermometer. Some put a single layer of beans on a cookie sheet and put it in a hot oven, or use one of those stovetop popcorn makers that you crank. You don't really need a machine like the Bravi to achieve a solid home roast, but it definitely helps. There are smaller, less expensive machines to be had as well.
The key thing in any roasting of beans, whether it's at home or at a factory, is to keep the beans from contacting direct heat for too long and burning. Keeping everything moving and controlling temperature is well left to a mechanism especially designed for the task, in my opinion. Home roasters generally heat things to the 525-600 degree F range. Commercial roasters, by contrast, start at around 600 F and can get as hot as 1000 F.
What Happens in the Home Roaster
What comes out first is smoke...and lots of it...and it keeps on coming for about 15 minutes. Mainly it's chaff that's burning off, the papery skin that encases green beans. The smoke that's produced by the roaster is very herbaceous and acrid at first, then it becomes woodier and more aromatic as the beans dry out and the fats and carbohydrates in the green beans undergo transformation into the aromatic oils we all love (and crave in the morning) so much.
Roasting near a window, having a powerful outside-vented hood turned all the way up, or doing it outside is key. The level of oil in the beans means that the smoke will stick to your walls for a while, set off smoke detectors, and drive your roommate or spouse nuts...you can smell it for days.
Once the beans have been roasted to the level you want (which you have to determine through trial and error for the most part) they will need to cool and de-gas CO2 for at least 6 hours. Many people believe that waiting up to a day helps the flavor to develop fully. I've found over-night to be plenty, and since coffee flavors dissipate so fast, sooner is better than later to try a pot. Once the beans have rested, sock them away in an airtight container to minimize the loss of the aromatic oils you just worked so hard to create.
Just Want to Enjoy Something Amazing?
Here are a very few places I've been that stand out...
Blue Bottle Coffee Company in Oakland, California is a micro-roaster that's taking back coffee from the likes of Starbucks. They've got a stand in Hayes Valley in San Francisco where they serve coffee and espresso drinks, and they also have a cart the farmer's market at San Francisco's Ferry Building. They ship!
Barefoot Coffee Roasters in Santa Clara, CA are committed to coffee culture...like crazy...with a fair trade / organic let's do the right thing twist. Gorgeous capuccinos with amazing leaf-patterned crema and foam. Fabulous quality. They also sell roasted beans to the trade.
Spot Coffee is a phenom in Buffalo, New York and the surrounding area. They've got great quality beans and they also retail the home version of quality equipment. You've got to hang out in the Elmwood or Delaware locations to get the full vibe...it's young mixed with Buffalo yuppie professionals. Some queer, some college, some laptops.
Intelligentsia Coffee is the place to check out in Chicago. They've got a few locations, including Millenium Park. In addition to some of the most professionally prepared espresso drinks and lovingly roasted beans anywhere, Intelligentsia has a great website with lots of great information about where coffee comes from and how it's processed.
Subscribe to:
Posts (Atom)